Page 1 of 1
Electric installation update. 1946 C140.
Posted: Wed Aug 22, 2018 3:13 pm
by 5469
Hello
I am thinking about updating my original electrical installation.
It has most of the original cables. All the original 4AG fuses described by Neal Wright.
I have the original starter and dinamo.
The Grimes light is installed only in the left wing, so the right fuse hole is empty.
I keep the original electric Turn and Bank running accurately.
The new accesories are:
1) King NavCom KX 175 replaced the old radio
2) Collins XPDR TDR 950
3) Flight Comm intercom with internal 9 Volt backup battery
4) Garmin 195 connected to cigar lighter
I have seen the Klixon 74xx circuit brakers in A Spruce, seems to be well built and not expensive.
Now: I have searched to have inspiring ideas, but I did not find.
Any reading to point me to ?
Thanks a lot and kind regards,
Horacio
LV NGL
Re: Electric installation update. 1946 C140.
Posted: Fri Aug 24, 2018 5:40 am
by V529
Horacio,
You are pretty much on your own here............unfortunately.
I've seen many aircraft that have replace their little BUSS glass fuses with circuit breakers, but each was different, and never has anyone posted any paperwork to accompany their installation.
My recommendation (if you would call it that?) would be to just replace all your wiring with standard MIL spec wiring and either keep your fuses.
Or
Replace them with MIL spec circuit breakers. The Klixon units you referenced are as good as any.
The issue may be finding a BUSS bar that fits your application. I have no recommendation on that. If you have access to a aircraft salvage yard, you might be able to find something that works?
Re: Electric installation update. 1946 C140.
Posted: Fri Aug 24, 2018 8:38 pm
by 5099
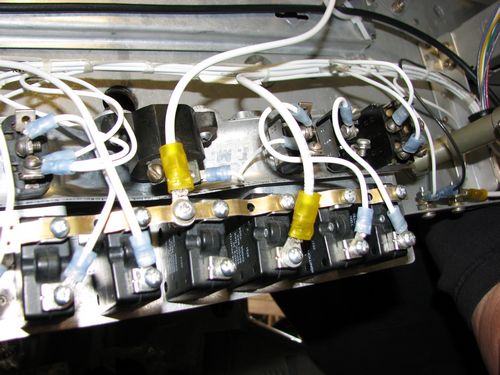
I replaced all of my old cloth covered (read that as oil soaked as well) wiring and fuses with circuit breakers and wiring approved per AC 43.13. This upgrade is acceptable and only needs a logbook entry. JMHO, Steve
I’ve tried to attach two pic’s.
The attachment IMG_2586med.JPG is no longer available

- IMG_2586med.JPG (83.13 KiB) Viewed 7438 times
Re: Electric installation update. 1946 C140.
Posted: Fri Aug 24, 2018 8:42 pm
by 5099
Sorry, seems the system wouldn't let me post two pictures or I didn't hold my mouth right.
I'll try again.
- IMG_2672med.JPG (56.54 KiB) Viewed 7437 times
Re: Electric installation update. 1946 C140.
Posted: Sun Aug 26, 2018 8:03 am
by 5469
Hello Victor, RR
Thanks very much for your inputs!
I have found all the materials at Steinair.
Even the copper material to build up the master bus.
The bus pic is great !!!
Have a nice sunday,
Horacio
Re: Electric installation update. 1946 C140.
Posted: Sun Aug 26, 2018 5:16 pm
by 5469
Hello,
One more question:
The wires are soldered or crimped to the terminals ?
Thank you !
Horacio
Re: Electric installation update. 1946 C140.
Posted: Sun Aug 26, 2018 8:56 pm
by 5099
5469 wrote: ↑Sun Aug 26, 2018 5:16 pm
Hello,
One more question:
The wires are soldered or crimped to the terminals ?
Thank you !
Horacio
You could solder them but still need to crimp them. I used nylon terminals and a double crimping tool. It’s a terminal crimper that has a ratchet system that will not let go of the terminal until the proper crimp pressure has been reached.
Aircraft Spruce, Aircraft Tool Supply and others have the tool.
Hope this helps.
Steve
Re: Electric installation update. 1946 C140.
Posted: Mon Aug 27, 2018 7:09 am
by 6643
Crimping is preferable to soldering. When you solder them the solder wicks up the wire, creating a stress point. The wire is prone to breaking at that point.
Re: Electric installation update. 1946 C140.
Posted: Mon Aug 27, 2018 4:55 pm
by 5469
Great !
Thanks very much,
Horacio